Getting a US passport photo used to mean standing in a long line at a photography studio, hoping your picture didn’t end up looking like a mugshot. But what if I told you that you can do it at home, without breaking the bank or waiting weeks? Yes, it’s totally possible! In this guide, we’ll walk through everything you need to know, step by step, to take a digital passport photo at home that passes government standards.
Why Taking Your Own Passport Photo Is Worth It
Taking your own passport photo may initially sound intimidating, but the benefits far outweigh the risks. One of the most obvious advantages is saving money. Professional studios often charge anywhere from $15 to $20 per photo, and if you need multiple copies, the cost can quickly add up. By taking your own digital passport photo at home, you eliminate these fees entirely. All you need is a smartphone or a digital camera, and you can produce a high-quality photo that meets official standards without spending a fortune. For frequent travelers or families applying for passports at the same time, the savings can be substantial.
Another major benefit is convenience. Traditional passport photo studios often require appointments, and even walk-ins may involve waiting in line for extended periods. By taking the photo yourself at home, you control the timing. You don’t need to fit your schedule around the studio’s hours, and you can take multiple shots until you are satisfied with the result. This flexibility is particularly helpful if you have a busy lifestyle, small children, or simply prefer to avoid the stress of crowded studios.
Taking your own photo also gives you complete control over how you look. At a studio, you may be rushed or forced into awkward poses, resulting in pictures with unintended expressions or poor lighting. When you manage the process yourself, you can ensure the lighting is flattering, your posture is correct, and your expression looks natural. You can experiment with angles, clothing choices, and background setup, which increases the likelihood of creating a photo that truly represents you and meets all official requirements.
Finally, DIY passport photos offer added privacy and comfort. Some people feel uneasy having their picture taken in a public studio, especially when being asked to pose repeatedly under a timer or flash. At home, you can take your time, make adjustments, and even use tools to check compliance with US passport standards without feeling rushed. Additionally, if you need to retake the photo for any reason, you don’t have to return to the studio or spend more money; you can simply adjust your setup and try again. This combination of cost savings, convenience, control, and comfort makes taking your own digital passport photo a smart and practical choice.
Understanding US Passport Photo Requirements
Before you snap that picture, it’s crucial to understand the official US passport photo rules. The State Department enforces strict standards, and even small mistakes can lead to rejection. To make sure your photo is accepted, pay attention to the following requirements:
- The photo must be exactly 2 x 2 inches (51 x 51 mm) in size. This precise measurement is non-negotiable, as any deviation can result in your application being delayed or rejected.
- Your head, from the bottom of the chin to the top of the hair, should measure 1 to 1 3/8 inches (25–35 mm). This ensures your face is clearly visible and properly scaled in the image.
- The photo must show a full-face, front view. Turned or angled faces are not acceptable, and both eyes must be fully open and visible.
- The background must be plain white or off-white, with no shadows behind your head or across your face. Busy patterns, textures, furniture, or any other objects are strictly prohibited.
- Lighting should be even and natural, avoiding harsh shadows, bright spots, or color casts that could distort your skin tone.
- Your facial expression should be neutral or a gentle, natural smile. Exaggerated expressions, frowns, or closed eyes are not permitted.
- Keep your mouth closed and avoid showing teeth in a wide smile. This helps maintain a consistent and professional image.
- Your eyes must remain fully open, clearly visible, and not obscured by hair, shadows, or glasses.
- Wear normal everyday clothing; uniforms are not allowed unless required for religious purposes. Clothing should not obscure the neckline or shoulders.
- Glasses are generally not allowed, except for medical reasons. If glasses are necessary, they must not produce glare, and the eyes must remain fully visible.
- Hats and head coverings are not allowed unless they are worn for religious purposes, in which case they must not obscure your face or cast shadows.
- Avoid accessories such as headphones, large earrings, or any items that might distract from your face or interfere with identification.
- Ensure that hair does not cover your eyes or eyebrows, as this can lead to photo rejection. Hair should be neatly arranged to maintain full visibility of your facial features.
- The overall image must be sharp, clear, and in focus, with no pixelation, blurriness, or digital distortions.
- The photo should be in color and printed on high-quality photo paper if submitting a physical copy. Black-and-white or low-quality prints are not acceptable.
Essential Tools You’ll Need at Home
| Tool | Purpose | Tips for Best Use | Alternatives | Common Mistakes |
| Smartphone or Digital Camera | Captures the image with sufficient quality for passport standards | Use a camera with at least 12MP resolution; ensure lens is clean; keep steady while taking the photo | Tablet with high-res camera; DSLR | Blurry photos due to movement, low-resolution images, dirty lens |
| Plain White Wall or Backdrop | Provides a uniform background that meets government requirements | Stand 4–6 feet from the wall to avoid shadows; remove all objects or patterns | Large white sheet, poster board, or roll of plain backdrop paper | Shadows, colored walls, cluttered background |
| Tripod or Stable Surface | Keeps the camera steady and at eye level | Use a tripod with adjustable height; place on flat, stable surface; use self-timer | Stack of books, shelf, or table for steady support | Tilted or uneven photos, accidental camera shake |
| Good Lighting | Ensures your face is clearly visible and evenly lit | Use natural daylight from a window; avoid direct sunlight; two light sources on each side if indoors | Ring light, LED panels, or desk lamps | Shadows on face, uneven brightness, color casts |
| Photo Editing Software | Crops and adjusts the photo to meet size and brightness requirements | Use reputable apps or software to crop to 2×2 inches, adjust brightness/contrast; do not over-edit | Free online passport photo tools, built-in smartphone editors | Over-editing with filters, changing background color, distorting facial features |
Preparing Your Space for the Photo
The environment where you take your passport photo is just as important as your pose or expression. Even a perfectly composed photo can be rejected if the background or lighting doesn’t meet US passport standards. The first step is choosing the right wall or backdrop. Ideally, you want a plain, light-colored surface—white or off-white works best. This ensures the background doesn’t distract from your face, which is the most critical part of the photo. Remove any decorations, pictures, posters, or furniture that could show up in the shot or cast shadows, as the US State Department requires a completely neutral backdrop.
Distance from the wall is also crucial. Standing too close can create harsh shadows on the background, which can make your photo non-compliant. Experts recommend positioning yourself 4–6 feet away from the wall, giving enough space for even lighting and preventing shadows. If your space is limited, you can also use a plain white sheet or backdrop to create a seamless background, but make sure it’s wrinkle-free and evenly hung to avoid visual distractions. The goal is to create a smooth, consistent background that draws attention solely to your face.
Lighting is the next critical element. Natural daylight is usually the best option, as it produces soft, even illumination that highlights your facial features accurately. Position yourself facing a window, ensuring the light falls evenly across your face. Avoid direct sunlight, which can create harsh shadows or overexposed areas that obscure facial details. If you’re taking the photo indoors without sufficient natural light, using two light sources on either side of your face can simulate daylight and help eliminate unwanted shadows.
Finally, take a few test shots to evaluate your space. Check for shadows on the background or across your face, uneven lighting, and any elements in the frame that could violate passport requirements. Adjust your position, lighting, or backdrop until the test shots are clear, evenly lit, and compliant with the official standards. By carefully preparing your space, you significantly increase the chances that your digital passport photo will be accepted on the first submission, saving time and reducing frustration.
How to Position Yourself
Getting your pose correct is essential to ensure your digital passport photo meets all US government requirements. Every small detail, from posture to eye alignment, matters for approval. To help you get it right, follow this comprehensive list of positioning guidelines:
- Stand straight with shoulders back: Maintaining an upright posture ensures your face is fully visible and proportional. Slouching or leaning can distort your features and make your photo non-compliant.
- Face the camera directly: Your face must be centered and looking straight ahead. Turning slightly to the side, tilting your chin, or angling your head can lead to rejection.
- Keep your eyes level: Make sure your eyes are horizontally aligned and looking directly into the camera lens. This helps maintain a clear, frontal view of your face.
- Look straight into the lens: Direct eye contact is required in passport photos. Avoid looking down, up, or off to the side, as this can make your photo non-compliant.
- Avoid tilting your head: Even a small tilt can create an uneven perspective, potentially leading to rejection. Keep your head completely upright.
- Position your shoulders evenly: Both shoulders should be visible and level. Uneven shoulder alignment can make the photo appear unbalanced.
- Keep your face fully visible: Ensure no hair, clothing, or accessories obscure your forehead, eyes, or cheeks. Full visibility is mandatory for identification purposes.
- Relax your facial muscles: Maintain a neutral expression or a slight, natural smile. Tension in your face can result in a rigid or unnatural look.
- Keep your mouth closed: A relaxed, closed mouth is essential unless you are giving a natural smile that does not show teeth.
- Maintain consistent distance from the camera: Stand far enough to capture your full head and shoulders without cropping any part of your face.
- Check for shadows on your face or background: Shadows can distort facial features and may cause the photo to be rejected. Adjust lighting or distance as needed.
- Ask someone to take the photo: Selfies often fail government standards due to improper angles, shadows, or cropping. Having another person take the photo ensures proper alignment and compliance.
- Review the test shots: Take several trial photos to verify posture, head alignment, and eye level. Only choose the ones that perfectly meet the requirements.
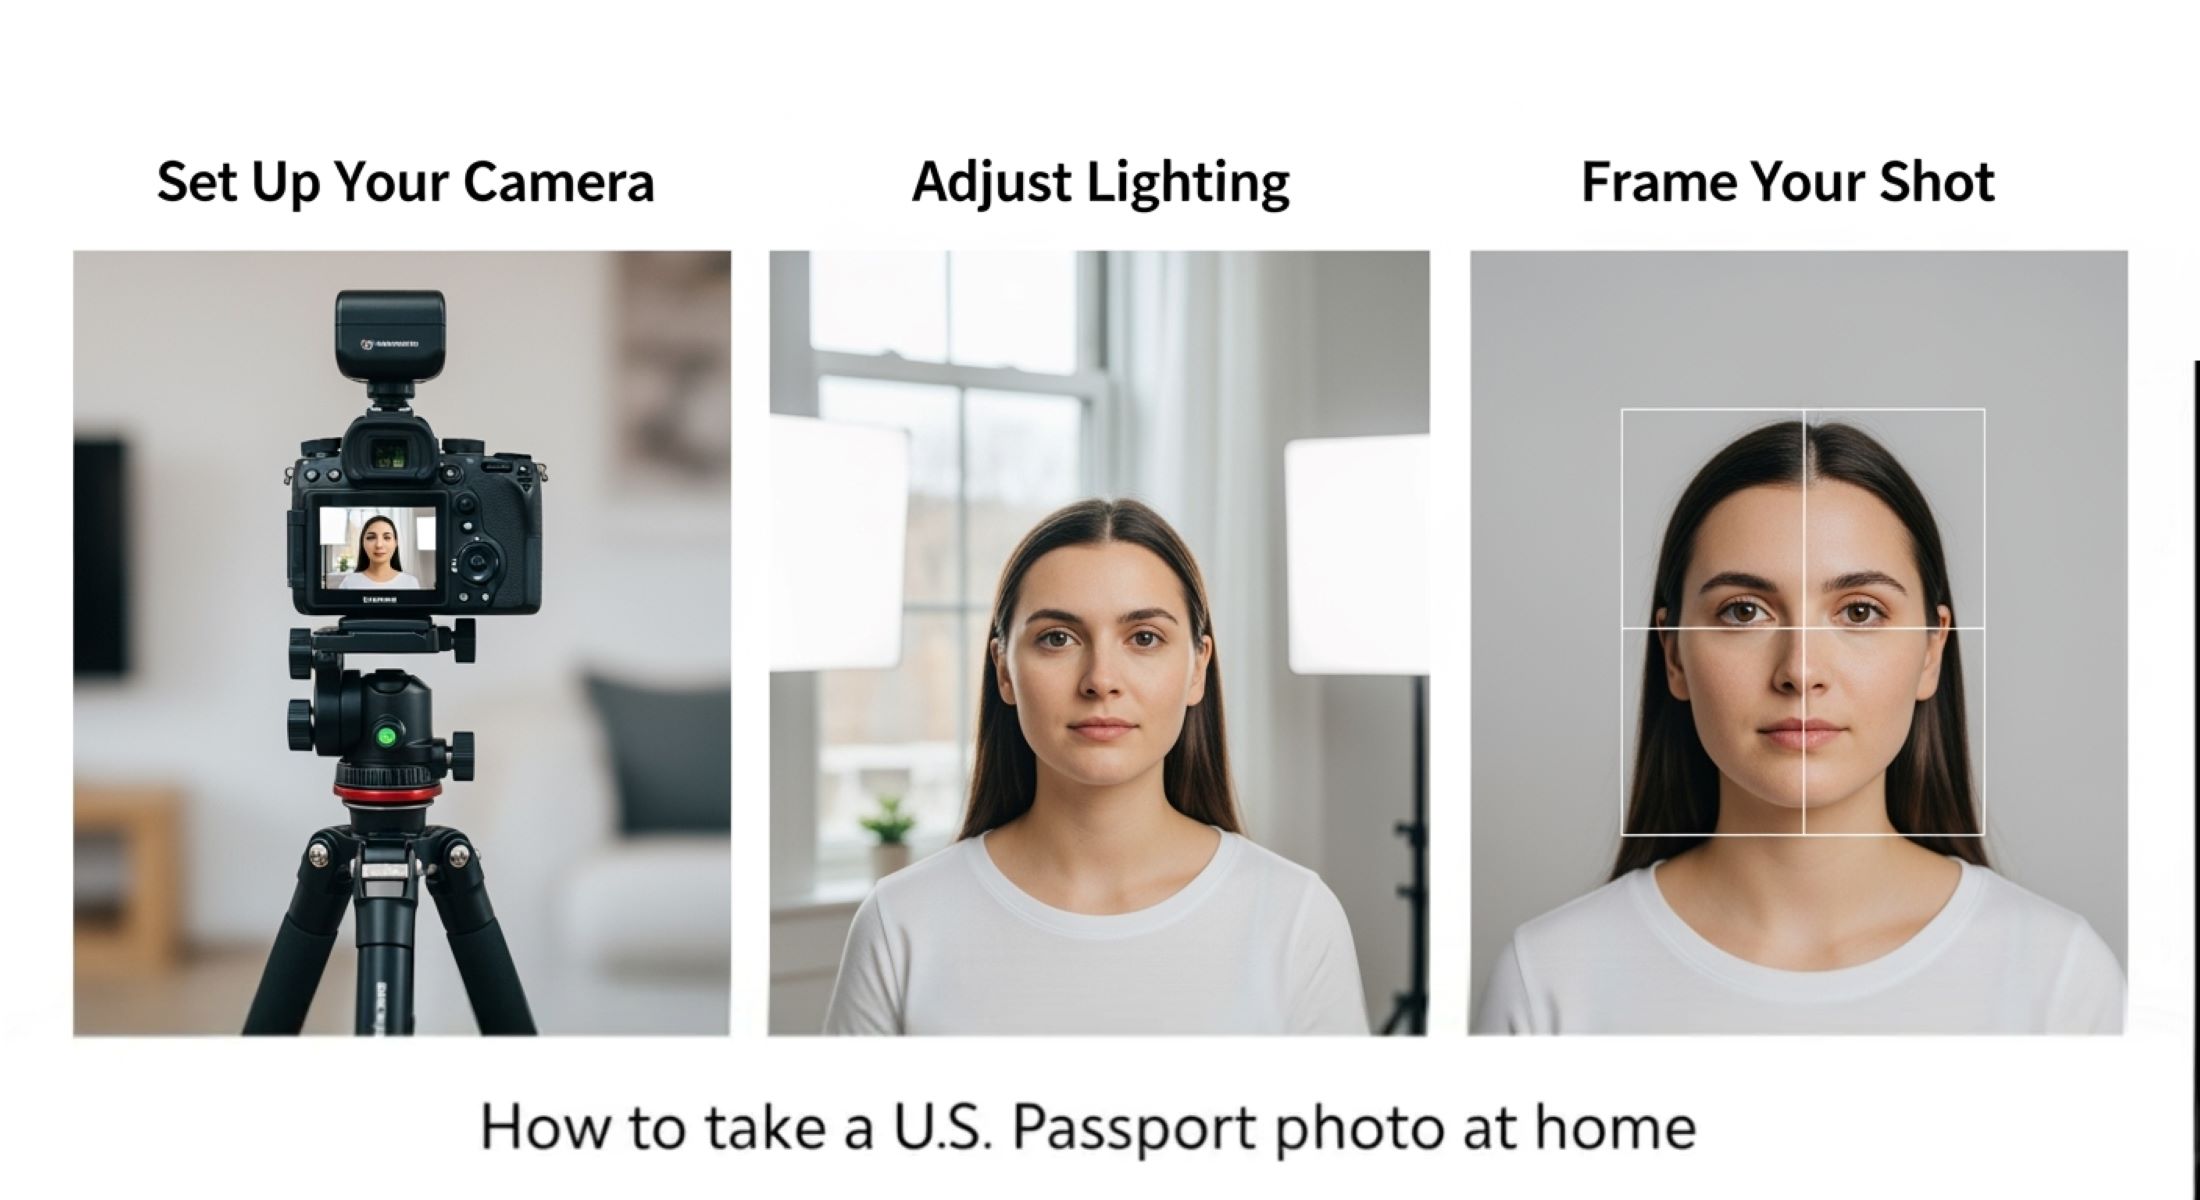
Taking the Photo Step-by-Step
| Step | Purpose | Tips for Best Use | Alternatives | Common Mistakes |
| Set Up Your Camera | Ensures the camera is stable and properly positioned for a clear, compliant photo | Use a tripod or any flat, stable surface; position camera at eye level; make sure full head and shoulders are in the frame | Stack books or a shelf to hold the camera steady if tripod unavailable | Camera tilted, cropped incorrectly, or unsteady resulting in blurry images |
| Frame Your Shot | Aligns the face and shoulders in proper proportions for passport requirements | Center your face; leave a small gap above the head; include both shoulders; ensure eyes are level with the camera | Use gridlines on your smartphone or camera to guide framing | Off-center face, uneven shoulders, cropped forehead or chin |
| Adjust Lighting | Eliminates shadows and ensures even illumination for facial recognition | Use natural light or two soft light sources; avoid harsh direct sunlight; check background for even lighting | Ring light, LED panels, or lamps with diffusers | Shadows on face or background, uneven lighting, glare from flash |
| Capture Multiple Shots | Provides options to select the best compliant image | Take 5–10 photos; maintain a neutral expression; check for blinks or facial distortions; review each photo carefully | Ask a friend to assist or use a self-timer to reduce camera shake | Blinking, awkward expressions, poor posture, or shadows in selected photo |
| Review and Verify | Confirms the photo meets all US passport standards | Compare photos against official guidelines; ensure proper head size, background, and facial expression; pick the clearest and most accurate photo | Use online passport photo verification tools to double-check compliance | Choosing a photo that violates size, background, or expression rules, leading to rejection |
Editing and Cropping Your Passport Photo
Once you’ve captured your digital passport photo, the next step is editing and cropping. While some adjustments are allowed, it’s important to remember that these should be minor and precise. The goal is to enhance clarity, ensure the photo meets official standards, and avoid any distortions that could lead to rejection. Over-editing, adding filters, or altering your facial features in any way can cause the US State Department to reject your photo, so the key is subtlety and accuracy.
Cropping is one of the most critical aspects of preparing your passport photo. The final image must be 2 x 2 inches, and your head should be perfectly centered, occupying 50–70% of the frame. Proper cropping ensures your facial features are clearly visible, including the top of your head and the bottom of your chin, while also showing your shoulders. Using tools or apps with a built-in cropping guide for passport photos can help you maintain the correct proportions without guesswork.
Color and exposure adjustments can significantly improve the quality of your photo without violating official rules. Brightness and contrast can be fine-tuned to make sure your face is clearly visible and not washed out by shadows or overexposure. However, the background must remain plain and white at all times; altering the color or introducing gradients is strictly prohibited. Ensuring accurate color representation is especially important because passport photos are used for identification purposes, and incorrect skin tones or lighting can compromise the photo’s validity.
Finally, avoid using any filters or effects, such as Instagram-style presets, smoothing tools, or color tints. Your passport photo must remain true-to-life, reflecting your natural appearance without artistic enhancements. Even minor alterations to facial features, eye color, or skin tone can lead to rejection. The goal of editing is purely technical: crop to the correct size, adjust brightness and contrast, and make sure the background and face are clearly visible. By carefully following these guidelines, you can produce a polished, compliant digital passport photo that meets all US passport requirements.