Getting a passport photo taken seems simple, right? Snap a picture, print it, and voila! But anyone who’s gone through the process knows that it’s not always that easy. One small mistake can get your photo rejected, delaying your passport application and causing a headache. But here’s the good news—you don’t always have to start over or spend money at a professional studio. Many common passport photo mistakes can be fixed at home with some careful attention and a bit of patience. Let’s walk through everything you need to know.
Why Passport Photos Are So Strict
Passport photos are not just casual snapshots; they serve as official identification tools that border authorities, immigration officers, and security personnel use to confirm a traveler’s identity. Unlike personal photos, passport photos must follow international biometric standards to ensure uniformity across countries. These strict standards help machines and people alike to recognize faces easily, regardless of where the passport is presented. Even small errors, like shadows or improper head placement, can interfere with biometric scanning systems, making it harder to verify an identity.
Another reason for the rigidity is fraud prevention. Governments around the world constantly deal with attempts at identity theft, falsified documents, or altered photos. By enforcing strict rules on lighting, background, facial expressions, and clarity, authorities make it harder for fraudulent applications to slip through the cracks. A standardized system ensures that every passport photo looks consistent and makes tampering much easier to detect. What might look like a harmless mistake in your photo could actually raise red flags during verification.
Consistency is also a major factor in ensuring fairness and equality. With millions of passports issued each year, all applicants must meet the same standards regardless of where they live or how they take their photos. This universal approach avoids confusion at international borders and creates a level playing field. Imagine the chaos if some countries allowed smiling, colorful backgrounds, or accessories, while others didn’t. The strict guidelines eliminate ambiguity and maintain global consistency.
Finally, strict passport photo rules are in place to speed up processing times. When photos don’t meet the standards, applications get delayed, rejected, or returned to the applicant, wasting both time and money. By following the rules, governments ensure that photos can be processed quickly and efficiently without extra scrutiny. In other words, these picky requirements are not just about control—they are about protecting your identity, safeguarding global security, and ensuring smoother travel experiences for everyone.
Common Passport Photo Mistakes
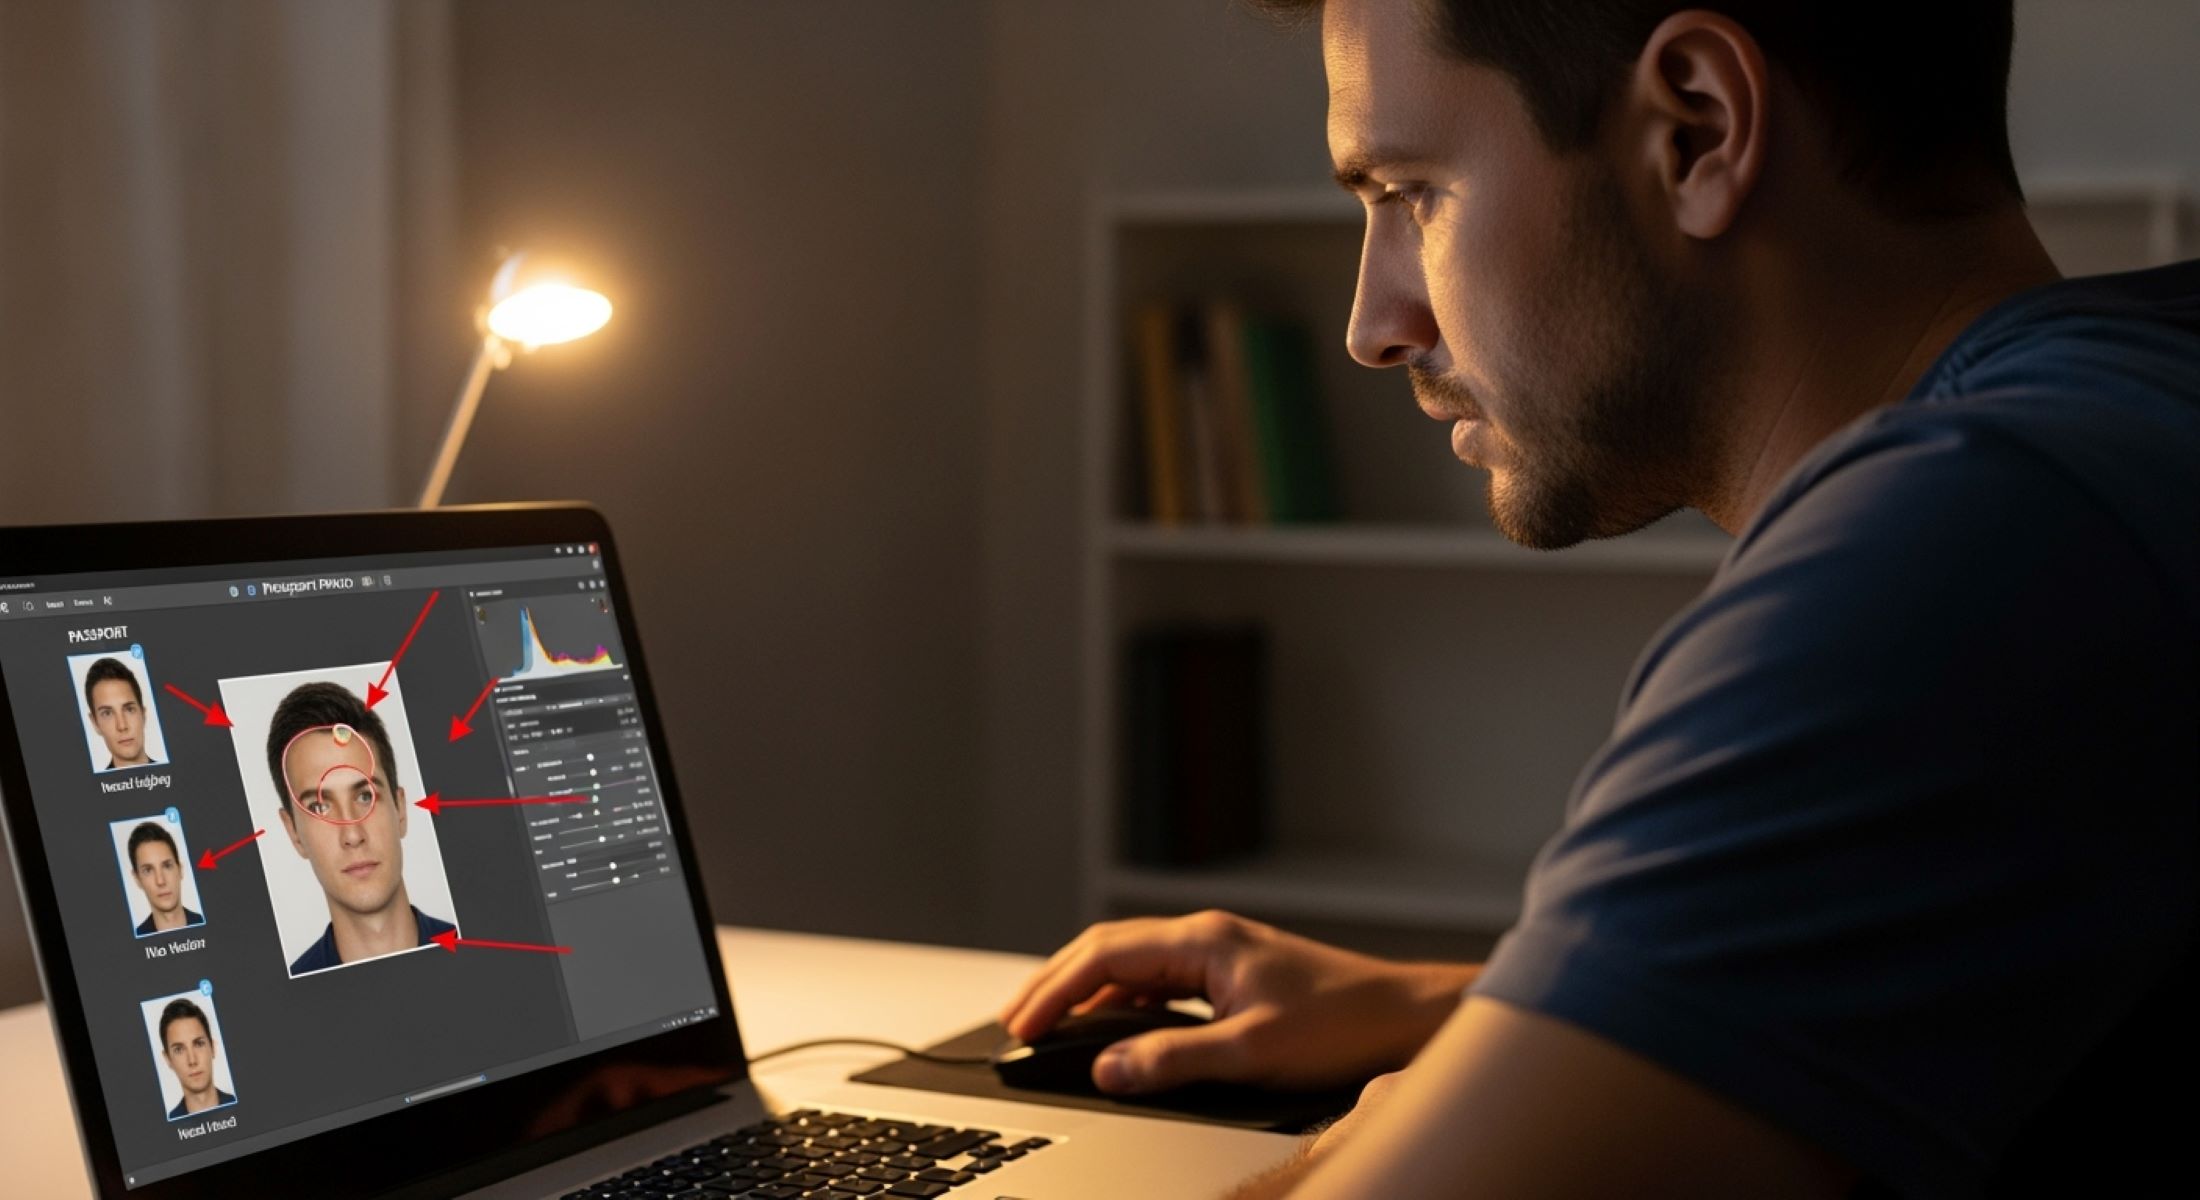
Let’s list the usual suspects first. Knowing what can go wrong is the first step toward fixing it at home. Many people assume that any clear photo of themselves will do, but passport authorities are far stricter. Below is a detailed breakdown of the most common mistakes that cause rejections and delays.
- Wrong background color – One of the most frequent issues is using the wrong background. Passport photos generally require a plain, light-colored background, typically white or off-white. Photos taken in front of patterned walls, colored backdrops, or textured surfaces almost always get rejected.
- Shadows on the face or background – Shadows can make identification harder and give the photo an unprofessional look. They often occur when the subject is too close to a wall or when lighting is uneven. Even faint shadows behind the ears or neck are enough to invalidate a photo.
- Improper head positioning – A tilted head, slouching shoulders, or an off-center pose may seem minor but are major problems for passport authorities. The head must be fully visible, centered, and facing directly forward. Even slight angles can interfere with facial recognition systems.
- Poor lighting – Harsh or dim lighting can wash out facial features or create glare on the skin. Underexposed photos look too dark, while overexposed ones make the face look unnaturally pale. Consistent, even lighting is essential for clear identification.
- Eyes closed or blinking – It might seem obvious, but many people accidentally submit photos with partially closed eyes due to blinking during the shot. Since eyes are critical for recognition, they must be fully open and clearly visible.
- Facial expression issues – Passport authorities require a neutral expression. Smiling widely, showing teeth, or frowning can all lead to rejection. A slight, natural expression is fine, but exaggerated emotions don’t pass official standards.
- Clothing not compliant – Certain outfits, such as uniforms, camouflage patterns, or overly flashy clothing, are not allowed. Head coverings or hats are prohibited unless worn for religious or medical reasons. Clothing must also contrast with the background for clear visibility.
- Glasses glare – Wearing glasses in a passport photo can cause reflections that obscure the eyes. Even if glare isn’t obvious to you, it may be detected during review. In most cases, applicants are asked to remove glasses entirely to avoid the problem.
- Blurry or pixelated images – A lack of sharpness is another rejection trigger. Blurry photos, whether due to shaky hands, poor cameras, or low resolution, fail the clarity requirement. Pixelation from digital compression or enlarging a small photo is also unacceptable.
- Incorrect size or cropping – Perhaps the most common mistake of all is submitting the wrong photo size. Passport photos must fit exact dimensions, and the head must occupy a specific portion of the frame. Photos that are too zoomed in, too far away, or unevenly cropped won’t be accepted.
Fixing Background Mistakes
| Method | What You Need | How It Works | Advantages | Things to Watch Out For |
| Use a plain wall | A smooth, light-colored wall (white or beige) | Stand 3–4 feet away from the wall to prevent shadows and ensure even background | No editing required, looks natural, easy to do at home | Walls with texture, stains, or patterns may cause rejection |
| DIY backdrop | Large white sheet, poster board, or cloth | Hang the material flat behind you to create a seamless backdrop | Affordable, reusable, portable | Wrinkles, folds, or uneven hanging can create shadows |
| Digital background editing | Software like Photoshop, Canva, or free online editors | Remove the existing background and replace it with a plain white/gray fill | Professional-looking results, easy corrections | Over-editing may alter face edges, must look natural |
| Use background apps | Passport photo apps (e.g., Passport Photo Online, IDPhoto4You) | Automatically detects and replaces the background with the correct color | Saves time, beginner-friendly | Some apps leave watermarks in free versions |
| Lighting adjustments | Two soft light sources or natural daylight | Proper lighting reduces visible shadows and makes the background appear smoother | Enhances both background and facial clarity | Uneven lighting can still cause dark patches on the wall |
Eliminating Shadows
Shadows may seem harmless, but when it comes to passport photos, they are one of the most common reasons for rejection. Even a faint shadow behind your head, under your chin, or on the wall can make the photo appear unprofessional or tampered with. Shadows interfere with biometric systems that rely on clear and consistent images of your face. Since passport photos must meet international standards, eliminating shadows isn’t just about making the picture look nice—it’s about ensuring the image is acceptable for official use.
The key to reducing shadows is good lighting. Natural light is always the best option because it spreads evenly and doesn’t create harsh lines. Position yourself near a window where daylight comes in indirectly, as direct sunlight can be too strong and cast sharp shadows. If you’re shooting at night or in a room with limited natural light, use two soft light sources placed on either side of your face. This balanced setup helps distribute light evenly and minimizes unwanted dark areas. Avoid overhead lighting because it tends to create unflattering shadows around the eyes and nose.
Another simple but often overlooked trick is adjusting your distance from the background. Standing too close to the wall almost guarantees that you’ll cast a noticeable shadow behind you. Moving just two or three feet away can make a huge difference, as the light disperses before reaching the background. This small adjustment helps keep the wall evenly lit and shadow-free. If space is limited, consider hanging a white sheet or poster board as a backdrop a short distance behind you—it softens the look and prevents your body from casting dark outlines.
For minor corrections, photo editing software can be helpful. Tools like Photoshop, GIMP, or even free online editors allow you to reduce or remove faint shadows without altering your facial features. However, this must be done carefully. Over-editing can leave obvious marks or blur the edges of your face, making the photo look manipulated, which could lead to rejection. The goal is subtle improvement, not dramatic changes. Ideally, it’s best to fix shadows during the photo-taking process rather than relying heavily on digital corrections.
Correcting Head Position
Passport photos require your head to be centered, facing straight forward. Even the slightest tilt or off-center angle can cause your application to be rejected, as biometric scanners and human reviewers rely on precise alignment for accurate identification. Below is a detailed list of methods you can use to correct and perfect your head position when taking or editing a passport photo at home.
- Check your posture before taking the photo – Stand or sit upright with your shoulders relaxed. A slouched or leaned-back position often causes the head to tilt without you noticing. Good posture naturally helps align your head.
- Use a mirror for positioning – Place a mirror directly behind or beside the camera so you can see yourself as the photo is being taken. This simple trick allows you to make quick adjustments if your head is slightly tilted to one side.
- Align the camera at eye level – The camera should always be at the same height as your eyes. If it’s positioned too high or too low, it will distort the photo and give the impression of a head tilt. Using a tripod or stable surface helps maintain proper alignment.
- Look straight into the lens – Keep your gaze fixed on the camera lens as if you were looking someone in the eyes. This ensures both your eyes are level and your face is centered, which is critical for biometric accuracy.
- Use guiding lines for balance – Some smartphones and cameras allow you to turn on a grid display. This helps you position your face symmetrically by lining up your eyes and nose with the central grid lines.
- Take multiple shots for safety – It’s easy to think your head looks straight when it’s actually slightly tilted. By taking several photos in one sitting, you increase your chances of capturing the perfect alignment.
- Rotate the image digitally (if necessary) – Minor tilts can be corrected using editing software. Rotate the photo slightly until your eyes and shoulders appear level. However, make sure not to over-rotate, as it can stretch or distort your facial proportions.
- Avoid heavy editing or cropping tricks – Overusing digital tools to “fix” alignment often makes the photo look unnatural. Passport authorities can detect obvious editing, and your photo might get flagged or rejected. Always aim for natural balance rather than digital perfection.
- Use a helper if possible – Sometimes it’s hard to judge your own head position in real time. Asking a friend or family member to double-check can save you from retaking multiple photos.
- Practice in front of a mirror before the shoot – Practicing neutral head positioning in advance can make the process smoother. Stand in front of a mirror, hold your head straight, and memorize how it feels. This muscle memory will help when it’s time for the actual picture.
Fixing Lighting Issues
| Method | What You Need | How It Works | Advantages | Things to Watch Out For |
| Natural daylight | A window with indirect sunlight | Position yourself facing a window where daylight is filtered (for example, through a sheer curtain) to spread light evenly across your face | Soft, natural glow with minimal effort; free and reliable during the day | Direct sunlight creates harsh shadows and may cause squinting |
| Avoid overhead lighting | Standard ceiling light or lamp | Instead of relying on light from above, use side or front lighting to reduce dark areas under your eyes, nose, and chin | Prevents unflattering shadows that distort facial features | Overhead light alone often highlights imperfections and makes photos unusable |
| Use reflectors | White cardboard, poster board, or aluminum foil | Place the reflector below your face or to the side to bounce light evenly across the face and eliminate uneven dark spots | Affordable, easy to set up, creates professional-quality balance | Reflectors too close may create glare or shiny skin |
| Use soft lamps | Two lamps with soft bulbs or diffusers | Place one lamp on each side of your face at equal distance to distribute light evenly | Works well for night photos, mimics studio lighting, flexible setup | Harsh bulbs without diffusers can create sharp edges or hotspots |
| Adjust background and distance | White or light-colored wall + 2–3 feet space | Standing a few feet away allows light to spread naturally without creating shadows on the background | Ensures both the subject and background remain evenly lit | Too close to the wall results in shadows; too far reduces light coverage |
Eyes Open and Visible
One of the most overlooked but critical requirements for passport photos is that your eyes must be fully open and clearly visible. Even a slight blink or squint can cause the photo to be rejected because the eyes are a primary feature for identification, both for human reviewers and biometric systems. Closed or partially closed eyes can obscure key facial landmarks, making it harder to verify your identity. This might seem like a small detail, but it can lead to costly delays and repeated trips to retake your photo.
The first step to ensuring your eyes are open is practice and preparation. Before taking the photo, stand in front of a mirror and practice holding your gaze naturally without blinking. Take a few deep breaths to relax your face and focus your attention on the camera lens. Proper relaxation helps prevent involuntary blinking and allows your eyes to remain open longer when the picture is being taken.
Another effective method is taking multiple shots. Instead of relying on a single attempt, take 5–10 photos in one session. This increases the likelihood of capturing a moment when your eyes are perfectly open, aligned, and looking directly at the camera. Many people don’t realize that even tiny timing differences between shots can make the difference between a rejected and accepted photo. Patience here pays off significantly.
For minor corrections, digital editing tools can help fix slight squints or uneven eyes. Software like Photoshop or other online photo editors allows subtle adjustments without altering the overall natural appearance of your face. However, it’s important to keep these edits minimal. Over-editing can create unnatural results or even cause the photo to be rejected if the changes are too obvious. The best approach is to combine careful preparation, multiple attempts, and minimal digital touch-ups to ensure your eyes are perfectly visible and compliant with passport standards.